
Development of Meteorological Station using Arduino and Android
Application for Data Processing
Dmytro Medvediev
1a
, Anatolii Suprun
1b
, Yuliia Lysenko
1c
, Vitalii Zadorozhnii
2d
and Yuliia Lavrinenko
3e
1
State University of Economics and Technology, 50005 Kryvyi Rih, Ukraine
2
Kryvyi Rih Lyceum of Nature and Sciences, 50071, Kryvyi Rih, Ukraine
3
National Technical University of Ukraine “Igor Sikorsky Kyiv Polytechnic Institute”, 03056 Kyiv, Ukraine
vitaliy_zadorozhniy@ukr.net
Keywords: Arduino, Android, Bluetooth, Data Transfer, Meteorological Station, Mobile Phone.
Abstract: The article shows the interaction between Android and Arduino, namely wireless data transfer from Arduino
devices and data processing in the application for the Android system. A prototype meteorological station
was created using temperature, pressure and humidity sensors. An android application has been developed to
receive and display information from the meteorological station. Bluetooth is used as a wireless data channel
from the meteorological station to the Android application. The versatility of the proposed application is added
by the fact that it is not connected to sensors and can receive, display and store data from any Bluetooth device.
1 INTRODUCTION
Thanks to the Internet of Things, we are getting closer
to the time when the house will be controlled by only
one device. This era has not yet come, but there are
already a lot of programs that help control the TV,
computer, media center and many other "smart"
devices. The combination of Android and Arduino
provides great opportunities for modern projects,
simplifying remote programming, management and
data synchronization. Mobile applications on a
smartphone allow you to interact with real physical
objects from anywhere on Earth using the usual
gadgets.
Wireless technologies use the environment
instead of wires as a data transmission medium. At
the same time, they provide the user with significant
mobility due to the wide (depending on the type)
range. They are actively expanding, signal stability is
increasing, data rates are increasing, energy
consumption is decreasing. The need for the
development of such technologies due to the
a
https://orcid.org/0000-0002-3747-1717
b
https://orcid.org/0000-0003-4985-7673
c
https://orcid.org/0000-0003-3418-9967
d
https://orcid.org/0000-0002-1003-930X
e
https://orcid.org/0000-0002-8059-363X
emergence of mobile and portable devices in our lives
is not reduced.
The aim of the article is to explore the possibilities
of combining systems such as Android and Arduino,
to show the possibility of using an application that is
simple on the one hand, and on the other allows you
to receive and store data from Arduino boards.
E. Vasinsky, N. Yaremchuk, V. Husar in the work
"Autonomous system for measuring climatic
parameters" consider systems for monitoring climatic
parameters, such as temperature and relative
humidity, as well as the level of carbon dioxide in the
air (Vasinsky & Yaremchuk, 2017). In their system,
the authors suggest using a battery and a solar panel
to charge the battery, data transmission is provided
using Bluetooth wireless technology. The whole
system is built on inexpensive, easily replaceable
components, which provides a low cost of the whole
system: the microcontroller is an Arduino Uno R3
board, as a Bluetooth module - model HC-05, to
measure humidity and temperature, the use of DHT22
sensor, and to determine air quality sensor MQ-135.
248
Medvediev, D., Suprun, A., Lysenko, Y., Zadorozhnii, V. and Lavrinenko, Y.
Development of Meteorological Station using Arduino and Android Application for Data Processing.
DOI: 10.5220/0011351300003350
In Proceedings of the 5th International Scientific Congress Society of Ambient Intelligence (ISC SAI 2022) - Sustainable Development and Global Climate Change, pages 248-255
ISBN: 978-989-758-600-2
Copyright
c
2022 by SCITEPRESS – Science and Technology Publications, Lda. All rights reserved
The proposed system allows you to monitor and
measure climatic parameters, as well as analyze them
using the Android application (Saini et al., 2016). It
should be noted that in the above-mentioned work,
the methods of measurement and data processing are
considered, but the application interface for the
Android system and the principles of its development
are not clear.
Arduino microcontrollers are often used to study
meteorological phenomena. So white the system of
research of melting of glaciers on the basis of Arduino
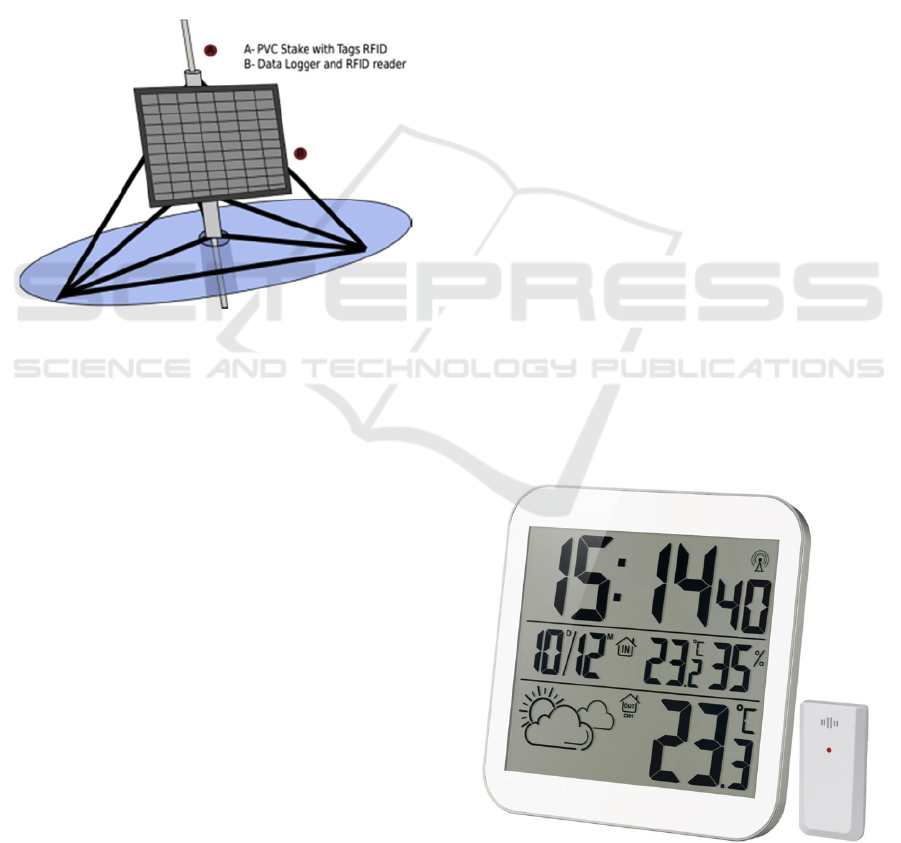
UNO is offered. Electronic Ablation Stations (fig. 1)
consist of sets of CPVC hot water tubes and a sensor
and datalogger module.
Figure 1: Electronic Ablation Station (eAS) schematic
view.
The technology used to read the behavior of the
glacier was the RFID, which is based on the use of
radio frequency and electromagnetic fields for
identification and tracking of the attached tags on
objects, in this case stakes. The sensor used was the
ID-20LA, a very simple to use RFID reader module
with a built-in antenna, operating at 125 kHz
frequency and needs a proximity of 10 cm of the tag
to make the recognition. The system is controlled by
an Arduino Uno microcontroller, and the data is
stored on a 4 GB microSD memory card. Every
system is powered by a12 V/7Ah 1battery,
maintained by a 10 W solar panel. The Automatic
Weather Station was developed using the Arduino
prototype platform and sensors compatible with this
environment. A systemic diagram of this Automatic
Weather Station can be divided into three main
groups: Data logger, power system and tri-pod. The
power system consists of a 10 W solar panel
measuring 20x30 cm. A 7 Ah NicCad battery
supports all system and its load as well as the
connections to the data logger are made by means of
a load regulator, LandStar LS0512R with rated cur-
rent of 5 A. Every system operates at rated voltage of
12 V. The data logger is mounted in a PVC watertight
case, using an Arduino Uno microcontroller, a Micro
SD card reader module responsible for storing the
data and a Real Time Clock module RTC DS1307,
responsible for maintaining the system’s calendar and
clock. Data is stored on 4 GBytes Micro SD memory
cards. But the cost of the whole complex is over
US$850, which makes it inaccessible for home use.
The intelligent weather station system based on
Arduino was designed by Beijing Institute of Fashion
Technology (Jing Xin et al., 2016). A simple set of
environmental information monitoring system had
been designed based on Arduino Uno. It contains the
temperature and humidity sensor, atmospheric
pressure sensor, the wireless transmission module and
clock module. The system not only can real-time
monitoring of environmental information, and can
use the wireless module to transmit environment
information to PC. This design has advantages of low
cost, low energy consumption and high speed. It not
only can be used to detect such as stable family
environment, can also be used in complex
environment, such as industrial and agricultural
information monitoring. This system is characterized
of high reliability and expansibility. It can choose
appropriate dust sensors or ultraviolet sensors to
monitor the environment dust concentration and uv
intensity. But to control it you need a PC, which
makes it inconvenient to use.
Today, various manufacturers offer the use of
home meteorological stations for use within a smart
home. They can use wired and wireless
communication with sensors. An example of such a
weather station is shown in Figure 2.
Figure 2: Home meteorological stations.
Development of Meteorological Station using Arduino and Android Application for Data Processing
249
Such devices have a similar interface. These
devices typically have two temperature sensors and
two humidity sensors for measuring inside and
outside the house. A clock has been added to the
weather station properties.
2 RESULTS AND DISCUSSION
2.1 Arduino
The data transmitter is a meteorological station
consisting of an Arduino Nano3 board, a DHT-11
humidity and temperature sensor, a bmp180 pressure
and temperature sensor and a HC-06 Bluetooth
wireless data module. Let's briefly consider these
components and their characteristics.
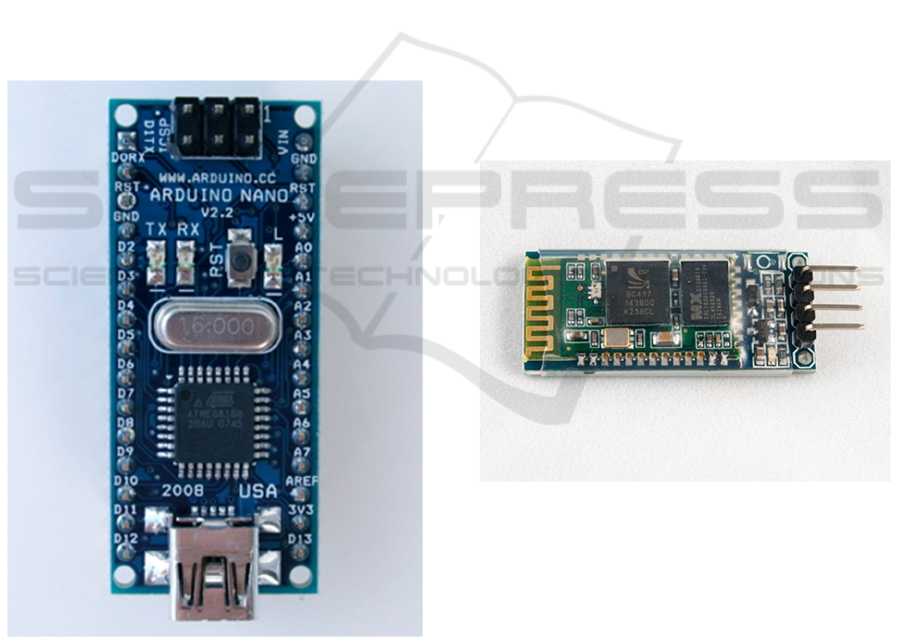
Arduino Nano (Fig. 3) is a full-featured miniature
device based on a microcontroller ATmega328
(Arduino Nano 3.0) or ATmega168 (Arduino Nano
2.x), adapted for use with a prototyping board.
Figure 3: Arduino Nano board.
The device is similar in functionality to the
Arduino Duemilanove, and differs from it in size,
lack of power connector, as well as another type of
(Mini-B) USB cable. The program memory of the
ATmega328 microcontroller is 32 KB (of which 2
KB is also allocated for the bootloader). In addition,
the ATmega328 microcontroller has 32 KB of RAM.
Using the pin Mode (), digital Write () and digital
Read () functions, each of the 14 digital pins of the
Arduino Nano can operate as an input or output.
Operating voltage of outputs - 5V. The maximum
current that can give or consume one output is 40 mA.
All outputs are connected to internal resistors
(disabled by default) of 20-50 kО. In addition to the
main ones, some Arduino outputs can perform
additional functions.
Serial interface: outputs 0 (RX) and 1 (TX). Used
to receive (RX) and transmit (TX) data over the serial
interface. These pins are connected to the
corresponding pins of the USB-UART converter chip
from FTDI. It is through these outputs that wireless
data transmission via Bluetooth is organized.
Bluetooth module HC-06 (Fig. 4) is designed for
wireless serial communication (HC 06 Bluetooth
module pinout, features & datasheet, 2021). It can
receive serial data if it is sent from the Bluetooth
headset. When the module receives wireless data, it
transmits it through the serial interface. The Arduino
chip does not require any source code specific to the
Bluetooth module.
Figure 4: Bluetooth module HC-06.
The HC-06 module has four pins that are required
for connection to the UNO Arduino. VCC is used to
obtain the input voltage, connected to pin 5V on the
board. The GND on the module is a ground contact
that plugs into the appropriate contact on the Arduino.
RXD and TXD are the receiving and transmitting
contacts on the module, the corresponding contacts
on the Arduino Nano board - D0 and D1.
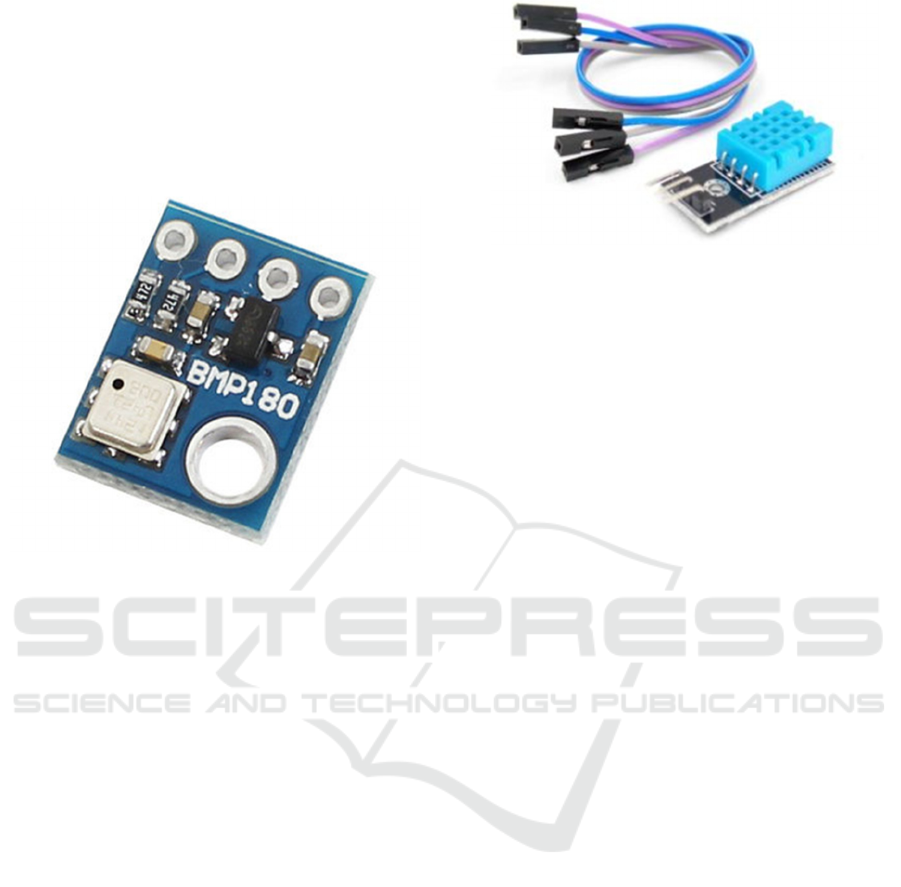
The most available pressure sensors, which are
often used in various homemade electronic devices,
include BOSH sensors: BMP085 and BMP180. The
second barometer is newer, but fully compatible with
ISC SAI 2022 - V International Scientific Congress SOCIETY OF AMBIENT INTELLIGENCE
250
the old version. Range of measured values: from 30
kPa to 110 kPa; supply voltage: from 3.3 to 5 V;
current: 5 μA at a data refresh rate of 1 Hertz.
The BMP 180 sensor (Fig. 5) has an I2C interface,
so it can be easily connected to any platform in the
family. When the bmp180 - Arduino Nano is
connected, the corresponding contacts are connected:
GND-GND, VCC-5V, SDA-A4, SCL-A5.
Figure 5: Atmospheric pressure sensor BMP180
.
The procedure for obtaining pressure from the
sensor is not trivial, and consists of several stages. In
a simplified form, the algorithm looks like this:
ask the barometer for data from the built-in
temperature sensor;
wait for time A while the sensor evaluates the
temperature;
get the temperature;
ask the barometer for pressure;
wait for time B while the sensor evaluates the
pressure;
get the value of pressure;
return the pressure value from the function.
The DHT11 sensor (Fig. 6) is very popular and is
often used in meteorological station and smart home
projects (Датчики температуры и влажности
DHT11 и DHT22 и Arduino Arduino-diy.com,
2021). This sensor is easy to use, you can safely use
it in your projects. The sensor consists of two parts -
a capacitive temperature sensor and a hygrometer.
The first is used to measure temperature, the second -
for humidity. Inside the chip can perform analog-to-
digital conversions and output a digital signal that is
read by a microcontroller.
Figure 6: DHT11 sensor with strapping.
In most cases, DHT11 is available in two
versions: as a separate sensor in the form of a plastic
housing with metal contacts or as a ready-made
module with a sensor and soldered strapping
elements. The second option is much easier to use in
real projects.
In this version of the sensor there are 3 contacts:
GND, VCC and a contact for digital data
transmission.
2.2 Program for Arduino
To write a sketch (program) for the operation of the
weather station you need to use special libraries for
sensors BMP180 and DHT11. Data is read from the
sensors every second, according to this period will be
transmitted via the Bluetooth module HC-06.
The program code looks like this:
#include <SFE_BMP180.h>
#include <Wire.h>
#include <DHT.h>
#include <SoftwareSerial.h>
#define DHTPIN 7
DHT dht(DHTPIN, DHT11);
SFE_BMP180 pressure
void setup()
{
Serial.begin(9600
pressure.begin
dht.begin
BTserial.begin(38400);
}
void loop()
{
char status;
double T,P;
status =
pressure.startTemperature();
if (status != 0)
{
delay(status);
status =
pressure.getTemperature(T);
Development of Meteorological Station using Arduino and Android Application for Data Processing
251
if (status != 0)
{
status =
pressure.startPressure(3);
if (status != 0)
{
delay(status);
status =
pressure.getPressure(P,T);
if (status != 0)
{
Serial.print(P/1.33322);
} } } }
float h = dht.readHumidity();
Serial.print (h,0);
Serial.println (" %");
delay(500);
if (Serial.available())
{
BTserial.write(h, P, T);
}
}
2.3 Android
To control Arduino boards using Bluetooth wireless
technology, they usually use ready-made mobile
applications that are freely available on Google Play.
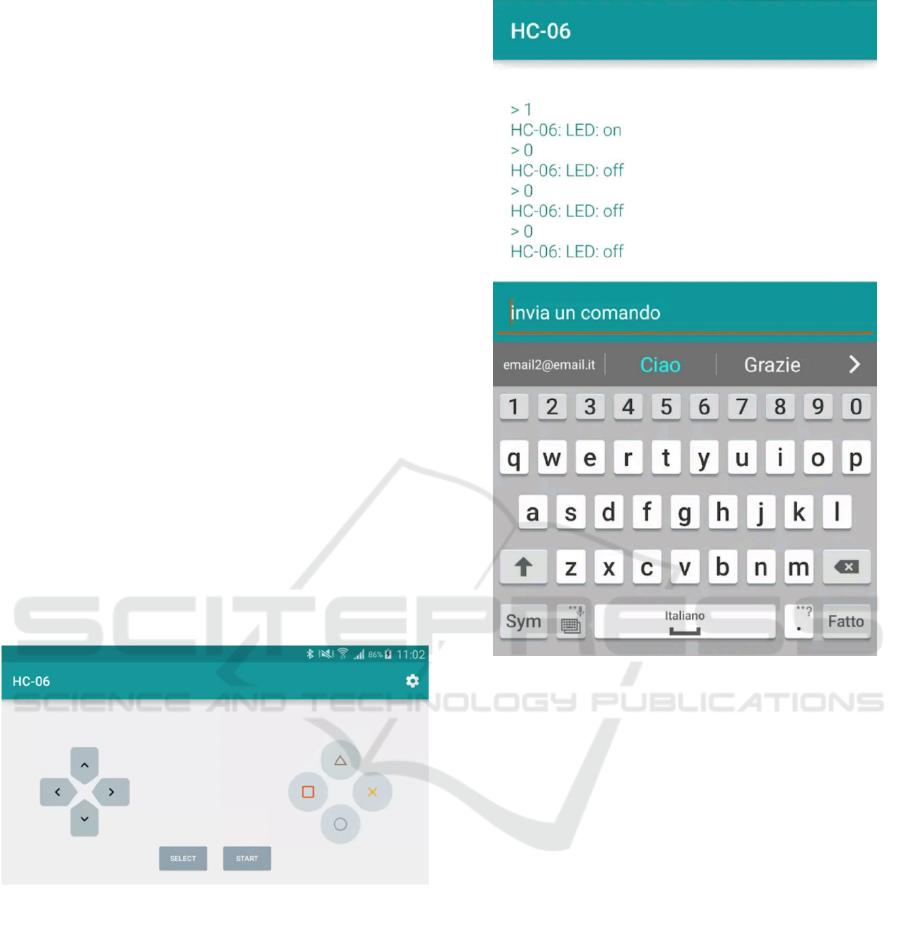
One example of such an application is the Arduino
Bluetooth Controller (fig. 7).
Figure 7:
Arduino Bluetooth Controller. Controller
mode.
This application has a simple interface and easy to
configure. The connection is in four different modes:
controller, switch, dim, terminal.
The controller mode is shown in Figure 8. This
mode is presented as a game controller interface.
Pressing any button on the screen sends the
appropriate command to the Arduino, which allows
you to conveniently transfer data and control your
robot using a mobile phone.
Figure 8: Arduino Bluetooth Controller/ Terminal mode.
Switching mode can only execute two commands.
This mode is convenient to use to remotely turn
devices on or off. As for the dimming mode, its
essence is that it can control such properties of the
device as speed or brightness, ie this mode changes
the value of the transmitted data. Such modes of
operation are not suitable for data reception at all.
Arduino Bluetooth Controller is one of the few
programs designed to control Arduino devices. In the
article "7 best applications on Android for Arduino
remote control" in addition to the above application,
there is an overview of six more, which are also
designed to control devices and have significant
limitations in data reception.
Thus, we can conclude that most applications for
the Arduino-Android pair are designed to control
devices, rather than to receive and store data from
them.
Therefore, it will be convenient for the user to use
not ready-made applications, but application
designers, which give greater opportunities to work
with information that is transmitted from Arduino to
Android and vice versa.
ISC SAI 2022 - V International Scientific Congress SOCIETY OF AMBIENT INTELLIGENCE
252
Android Studio, an integrated development
environment (IDE) for the Android platform, was
chosen for programming the mobile phone
application. This programming application uses the
IntelliJ IDEA Community programming environment
coding developed by JetBrains. Android Studio is
part of an open development model and is distributed
under the Apache 2.0 license. With it, you can solve
common problems that allow you to develop
applications for the Android platform. Android
Studio includes tools for easy testing of software for
compatibility with different versions of the Android
operating system and tools for creating applications
that run on mobile devices with screens of different
resolutions (tablets, smartphones, laptops, watches,
glasses, etc.).
The application is created in two pages:
"Designer" and "Blocks". Consider the "Designer"
tab. Screen1 - the main screen, which consists of 4
blocks and 2 invisible components: Chasy1 and
Client Bluetooth1 (Fig. 9).
Figure 9: Application components.
The first and last, Horizontal Location 4 and
Horizontal Location 5, are designed to display text
and buttons correctly relative to the background
image. Block VerticalLocation1 contains Select From
List 1 - a button with a selection of paired Bluetooth-
devices from the list, HorizontalLocation3 to indent
between the button and the text in Caption1, which
displays the status of the connection to the weather
station. Vertical Location2 contains the Inscription 2,
which transmits the data received from the
meteorological station, and Horizontal Location6 for
correct display.
Clock 1 is an invisible component that provides a
countdown using the clock of the android gadget. It
allows you to track the current time, count time
intervals, etc. The unit of time for Clock 1 is a
millisecond, by default in the application the timer
interval is set to 1000, 1 second.
ClientBluetooth1 is an invisible component
designed to connect Bluetooth devices, data transfer,
etc.
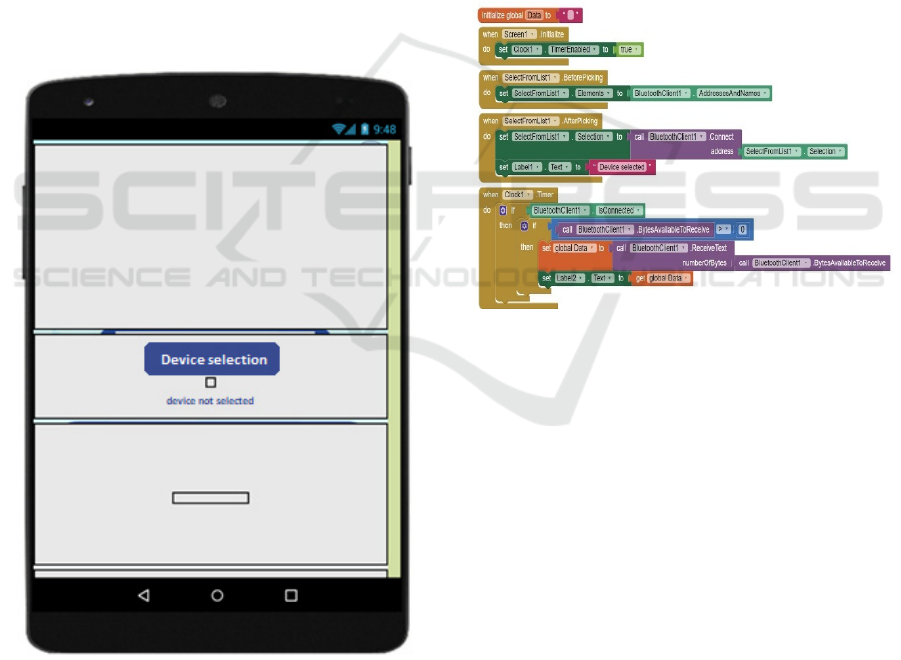
Consider the "Blocks" tab: The application
consists of 5 main blocks (Fig. 10).
Figure 10: Application blocks.
The first block "initialize global" Data "in" ""
creates an empty variable "Data", which will be used
to record the information received from the
meteorological station. When you turn on the
application, the block "when Screen1.Initialize" is
triggered, it turns on the timer so that the information
in Caption2 can be updated at a specified interval of
1 second.
The third block "when SelectFromList1. Before
Select" receives a list of conjugated Bluetooth-
devices
("assign SelectionFromList1.Elements to
ClientBluetooth1.AddressNames").
The fourth block "when
SelectionFromList1.AfterSelection" after selecting
from the list of conjugated devices - connects to the
device, changes the inscription in Caption1 to
"Device selected".
The last block "when Clock1.Timer" if the timer
is on, updates every second information: checks
Development of Meteorological Station using Arduino and Android Application for Data Processing
253
whether the device is connected ("if
ClientBluetooth1.Connected"), whether there is data
to receive
("if the callClientBluetooth1.BytesAvailableFor
Accept> 0", if so - records the received information
in the variable "Data", and also displays on the screen
in "Inscription2".
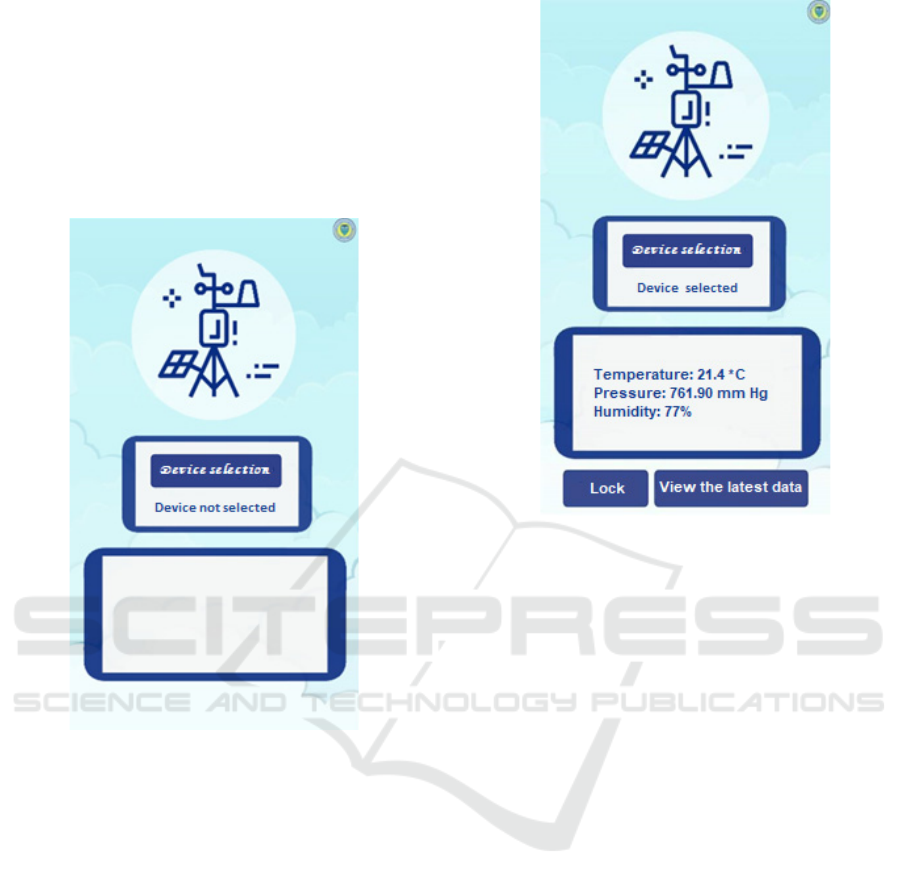
The main screen of the application for receiving
data is shown in Figure 11. before selecting a device.
Figure 11: The main screen of the meteorological station
before selecting a Bluetooth device.
The main screen of the application after
connecting to a Bluetooth device and receiving data
(Fig. 12).
From fig. 12 you can see that the application for
the phone not only displays data obtained from
Arduino sensors, but also allows you to store them
and view at a user-friendly time.
Figure 12: The main screen of the meteorological station
after selecting a Bluetooth device.
The following is the part of the application that is
responsible for connecting two Bluetooth devices.
txtArduino = (TextView)
findViewById(R.id.txtArduino);
h = new Handler() { public void
handleMessage(android.os.Message msg)
{switch (msg.what) { case
RECIEVE_MESSAGE:
byte[] readBuf = (byte[]) msg.obj;
String strIncom = new
String(readBuf, 0, msg.arg1);
sb.append(strIncom int
endOfLineIndex = sb.indexOf("\r\n
if (endOfLineIndex > 0) { String
sbprint = sb.substring(0,
endOfLineIndex);
sb.delete(0, sb.length());
txtArduino.setText("Ответ от
Arduino: " + sbprint);
btnOff.setEnabled(true);
btnOn.setEnabled(true);
break;
} }; };
private class ConnectedThread
extends Thread
{ private final BluetoothSocket
mmSocket;
private final InputStream
mmInStream;
private final OutputStream
mmOutStream;
ISC SAI 2022 - V International Scientific Congress SOCIETY OF AMBIENT INTELLIGENCE
254

public
ConnectedThread(BluetoothSocket socket)
{mmSocket = socket;
InputStream tmpIn = null;
OutputStream tmpOut = null;
try { tmpIn =
socket.getInputStream();
tmpOut = socket.getOutputStream();}
catch (IOException e) { }
mmInStream = tmpIn;
mmOutStream = tmpOut;
}
public void run() { byte[] buffer =
new byte[256]; int bytes;
while (true) {
try {
bytes = mmInStream.read(buffer);
h.obtainMessage(RECIEVE_MESSAGE,
bytes, -1,buffer).sendToTarget();}
catch (IOException e) {
break; } } }
3 CONCLUSIONS
The use of the Arduino to create measuring
instruments has long been popular, but in this article,
we try to show how the interaction of two different
systems simplifies the transmission, reception, and
processing of data. The study selected Bluetooth for
wireless data, which is most convenient for use within
a home or small household. That is, it is convenient
for data transmission over short distances,
economically accessible, easy to program and
operate. The result of the study is an application for a
smartphone with the Android operating system for
receiving data from the meteorological station. The
versatility of this application is added by the fact that
it is not connected to sensors and can receive, display
and store data from any Bluetooth device. This
application can be developed and can later be used to
manage a "smart home".
Compared to existing meteorological stations, this
development has advantages and disadvantages. The
advantage is convenient remote control. A
smartphone is always at hand for everyone, and a
locally installed weather station must be nearby. Also,
with the help of the application you can connect other
weather stations or devices according to the Bluetooth
protocol. However, the latter may be a disadvantage,
because the data from this meteorological station can
be obtained by anyone who installs the application.
REFERENCES
H. Saini, A. Thakur, S. Ahuja, N. Sabharwal, N. Kumar,
2016. Arduino based automatic wireless weather station
with remote graphical application and alerts, in: 3rd Int.
Conf. Signal Process. Integr. Networks, SPIN 2016,
pages 605–609.
N. Yaremchuk, R. Semenjuk, 2017. Working of verbal data
for the constructions of card. Metrology and devices, 5:
pages 58-61
Jing Xin GAO, Hao MA, Hao LIU, 2016. The intelligent
weather station system based on Arduino. International
Conference on Engineering and Advanced Technology
(ICEAT 2016), pages 300-308
Different Types of Wireless Communication Technologies.
https://www.watelectronics.com/different-types-of-
wireless-communication-technologies/
Zigbee. https://zigbeealliance.org/solution/zigbee/
Bluetooth Tutorial Tutorial-Reports.com.
http://www.tutorial-
reports.com/wireless/bluetooth/tutorial.php
Bluetooth® Technology Website.
https://www.bluetooth.com/
Датчики температуры и влажности DHT11 и DHT22 и
Arduino Arduino-diy.com. http://arduino-
diy.com/arduino-datchiki-temperatury-i-vlazhnosti-
DHT11-i-DHT22
Comparison of Wireless Technologies Bluetooth, WiFi,
BLE, Zigbee, Z-Wave, 6LoWPAN, NFC, WiFi Direct,
GSM, LTE, LoRa, NB-IoT, and LTE-M.
https://predictabledesigns.com/wireless_technologies_
bluetooth_wifi_zigbee_gsm_lte_lora_nb-iot_lte-m/
What are ZigBee, WiFi, Bluetooth, BLE, and WiMax by
Brian Ray IoT For All Medium.
https://medium.com/iotforall/what-are-zigbee-wifi-
bluetooth-ble-and-wimax-260916018f34
What is WiFi and How Does it Work - CCM.
https://ccm.net/faq/298-what-is-wifi-and-how-does-it-
work
HC 06 Bluetooth module pinout, features & datasheet.
https://components101.com/wireless/hc-06-bluetooth-
module-pinout-datasheet
Development of Meteorological Station using Arduino and Android Application for Data Processing
255
